Poses for front portraits with hand: complete guide
Your hands are the problem. Not because they're ugly. Not because they're wrong. But because the moment someone says "smile," every person who's ever stood in front of a camera forgets they've had hands their entire life. Where do they go? What do they do? Why do they suddenly look like paddles?
If you've experienced this - and almost everyone has - you're not alone. Hand placement is one of the most searched topics in portrait photography for exactly this reason. It's the detail that makes or breaks a front-facing portrait. Get it right and the photo looks natural, confident, intentional. Get it wrong and even the most beautiful face can't save the shot.
This guide covers everything. The essential front portrait hand poses. The mistakes that consistently ruin otherwise good photos. Tips for photographers directing reluctant subjects. How to find the angles that work for different body types and personalities. Whether you're the person behind the camera or the one standing nervously in front of it, you'll leave with a clear picture of how to make hands look like they belong.
Before getting into technique, one thing worth knowing: if you want a stunning portrait without worrying about any of this, Fable transforms your best photos into breathtaking, museum-quality artwork in renaissance, classical, and royal styles. You upload a photo, Fable handles the artistry. Explore how it works and see why thousands of people choose a custom portrait over a standard photograph. But for those of you who want to nail the shot itself, let's get into it.
Why hands matter so much in front portraits
Stand in front of a mirror right now. Let your arms hang. What do you notice? Probably that your hands dangle in an odd, unnatural-looking way that feels fine in real life but photographs terribly. The camera flattens everything and removes the context our brains use to read normal standing posture as natural. What reads as "relaxed" to the eye reads as "awkward" through a lens.
Hands are also surprisingly large. Our brains downplay this because we're used to seeing them attached to people we know. But in a photograph, hands that fall close to the lens can look enormous, disproportionate, even comical. Positioning matters not just for aesthetics but for optical reasons.
And then there's the emotional read. Clenched fists signal tension. Arms crossed and locked signal defensiveness. Hands shoved entirely into pockets signal discomfort. Every hand position tells a story. In a portrait, that story either reinforces or undermines everything else the image is trying to say.
Senior portrait poses wrestle with this constantly - teenagers standing stiffly in front of backgrounds, not knowing what to do with themselves. Family portrait outfits guides address it too, since coordinated clothing can actually help direct the eye away from awkward hand placement. But the poses themselves are the foundation.
For family portraits, couple portraits, kids portraits, and self portraits, hand position changes the emotional register of the entire image. A gently resting hand suggests calm. A hand on a hip suggests confidence. Fingers lightly touching the face suggests thoughtfulness. None of these reads happen by accident. They're choices. And once you understand the vocabulary, you can speak it fluently.
The fundamentals: what makes hands look good on camera
Before specific poses, three foundational principles apply to almost every hand position in portrait photography.
Angle everything
The flat palm facing the camera is almost always the wrong choice. Flat hands, seen straight-on, look large and block the face or body. The solution is simple: angle the hand slightly so the thin edge faces the lens. Whether the thumb side or pinky side leads toward the camera depends on the pose, but the principle holds across nearly every situation. Angled hands appear smaller, more delicate, and more intentional.
This applies to fingers too. Straight, rigid fingers look stiff and mannequin-like. Gently curved fingers with a slight bend at each joint look natural and relaxed. The difference between a beautiful hand pose and an awkward one is often just the curve in those fingers.
Keep it soft
Tension travels to the hands first. When a subject is nervous, the hands clench. When they're uncomfortable, the fingers press too hard against whatever they're touching. The instruction "relax your hands" almost never works because it's too vague. More effective: ask them to gently wiggle their fingers and then let them fall naturally. This releases the tension without forcing an artificial position.
For photographers: watch the knuckles. White knuckles mean clenched grip. A fist, even a partially open one, reads as stress on camera. Before every shot, do a quick check. If the hands look tense, redirect before you shoot.
Give hands a job
The moment hands have something to do, they stop being awkward. This is the single most effective technique for subjects who don't know what to do with themselves. The job doesn't need to be elaborate. Holding a prop. Resting on a surface. Touching a piece of clothing. Adjusting a collar. Any gentle action gives the hands purpose and signals to the viewer that the pose is intentional.
This is especially relevant for maternity portrait ideas, where the most natural and beautiful poses often involve hands cradling the belly. The hands have a clear job. The image reads as tender and intentional. The same principle applies anywhere: give hands something to do, and the awkwardness dissolves.
The 10 essential front portrait hand poses
These are the positions that work consistently. Not every pose works for every person, but understanding the full set gives you options for any subject, any shoot, any style.
1. Hands relaxed at the sides
This is the hardest pose to execute well and the most often botched. In theory, hands simply hanging at the sides sounds neutral. In practice, it requires precise attention to avoid looking stiff and unnatural.
The key: don't let the arms press against the body. Even a slight gap between the arm and the torso makes the arms look longer, the body look slimmer, and the overall figure look more composed. Pull the elbows slightly away from the sides. Let the hands hang with fingers naturally curved. Tilt the whole hand so the thin edge faces slightly toward the camera rather than the flat palm.
This pose works best for formal portraits, professional headshots, and anyone who wants to project composure and confidence. It also works well in senior portrait outfits photos where the clothing itself is part of the composition and hands shouldn't distract.
The mistake most people make: letting the shoulders drop and the arms hang completely loose, which creates a penguin effect. Engage the shoulders very slightly. Not enough to show tension - just enough to lift the chest and give the posture some structure.
2. Thumbs in pockets
This is the go-to pose for casual, approachable portraits. One or both thumbs hook into the front pockets of jeans, a jacket, or a waistband, with the fingers naturally resting outside against the hip or thigh. It signals ease, informality, and self-assurance without trying too hard.
The distinction that makes this pose work: thumbs in, fingers out. Never bury the whole hand in the pocket. Fully pocketed hands disappear entirely, which looks odd and reads as hiding. The thumb-in hook keeps the wrist visible and the hand partially in frame, creating a natural diagonal line from shoulder to hip.
For men, this is one of the most reliable and flattering poses available. For women, it can work equally well depending on the clothing and the overall tone of the shoot. It pairs naturally with a slight lean forward on one leg, which adds movement and relaxes the whole posture.
Senior portrait poses frequently use this position for exactly this reason - it photographs well, it's comfortable to hold, and it reads as naturally confident without looking posed. Check out senior portrait outfits for guys for clothing choices that pair best with this pose.
3. One hand in pocket, one relaxed
The asymmetrical version of the above. One hand tucks into a pocket (thumb out), while the other hangs relaxed at the side or lightly touches the subject's clothing. This creates visual interest through contrast - the deliberate placement of one hand makes the relaxed placement of the other read as intentional rather than uncertain.
Asymmetry is almost always more visually engaging than symmetry in portraits. Two hands in exactly the same position look calculated. Two hands in different positions look alive. This is one of the clearest lessons from portrait photography, and it applies from casual headshots all the way to formal family portrait outfits group shoots.
A variation: one hand lightly gripping the opposite wrist or arm in a loose self-hold. This works especially well for subjects who need something to do with both hands but want to keep the pose clean. It also creates a subtle framing effect that draws the eye gently inward.
4. Hands on hips
Confident. Assertive. Powerful. The hands-on-hips pose reads all of these things, and it does so immediately. This is one of the most direct ways to project strength through body language in a portrait.
The execution matters enormously. There are two versions. The aggressive version - elbows pushed back and out, hands pressing into the waist from the front - can look combative or awkward. The better version: hands rest lightly on the hips from slightly to the sides, fingers pointing down or slightly forward, wrists relaxed. The elbows push gently backward, which opens the shoulders and creates a flattering triangular negative space between the arm and the torso.
That triangular negative space is the visual key. It makes the waist appear narrower, the shoulders appear broader, and the whole figure look more dynamic. Whether shooting a formal professional portrait or capturing someone for self portraits, this principle holds.
A softer variation: one hand on the hip, one hand relaxed. This gives the assertive energy of the pose while keeping it approachable rather than confrontational.
5. Arms crossed with soft hands
Arms crossed is often treated as a negative pose because it reads as defensive in real life. But crossed arms in a portrait don't have to read that way. The difference is in the hands.
When hands clench, grip, or ball into partial fists during a crossed-arm pose, the defensive reading kicks in. The viewer senses tension. But when the arms cross loosely and the hands remain soft - fingers lightly curled, palms relaxed against the opposite arm - the pose reads as composed, contained, and thoughtful.
One refinement: don't cross at the wrists with hands pressing into the upper arms. Instead, let one hand rest on the forearm with fingers slightly extended, while the other arm supports from below. This softens the whole structure. Combined with a slight tilt of the head, this becomes a deeply effective pose for subjects who want to look authoritative without looking stiff.
This pose photographs particularly well in senior portrait outfits with structured jackets or shirts, where the clothes add their own visual weight and the crossed arms feel complementary rather than defensive.
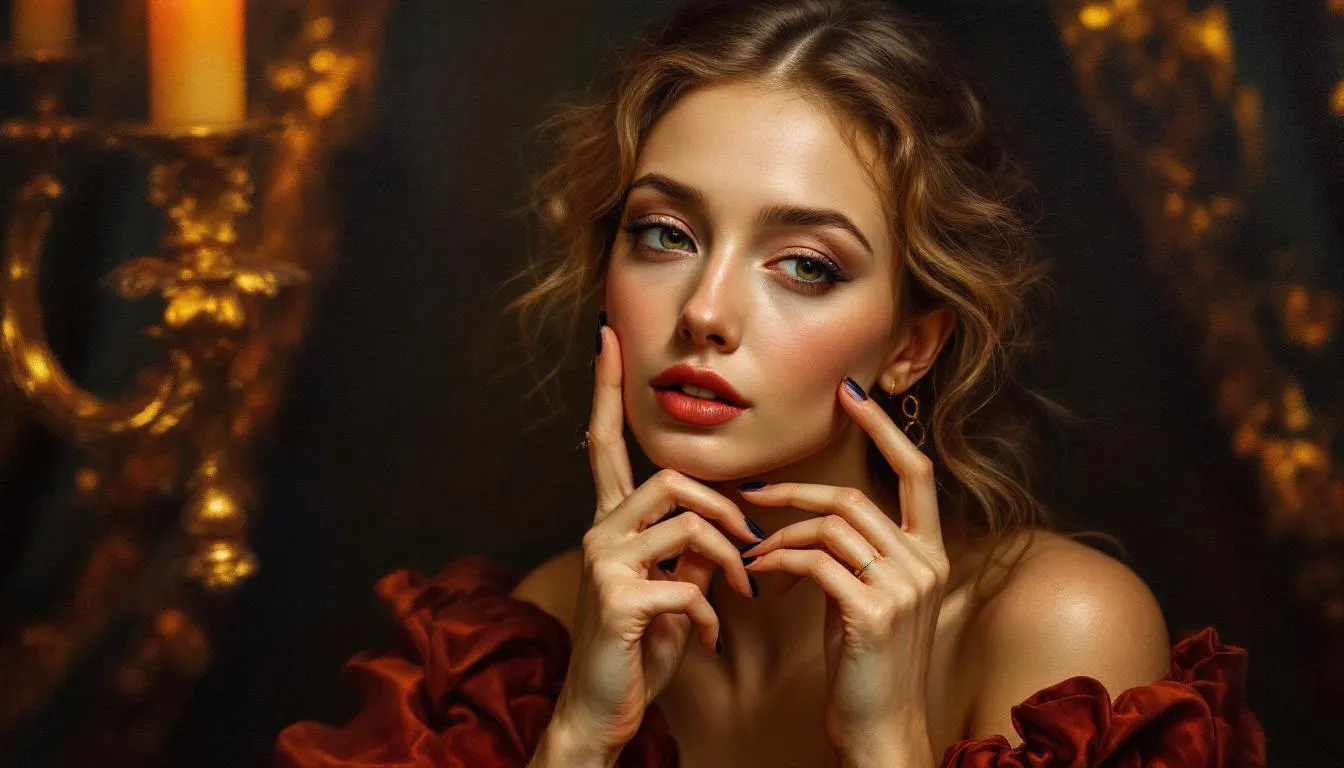
6. Hands near the face
This is where portraits get intimate and expressive. The hand near the face - at the temple, along the cheekbone, under the chin - creates a natural frame that draws the viewer directly to the subject's eyes and expression.
Several variations work well. A single hand at the temple, with fingers gently curved and the wrist relaxed, suggests thoughtfulness or concentration. One hand under the chin with the cheek resting lightly on the knuckles suggests a contemplative mood. Both hands framing the face creates a more dramatic, fashion-forward look.
The critical rule: gentle touch only. Hands pressing into the face distort the skin, create tension in the fingers, and produce unflattering pressure marks. The model should feel the touch - light fingertips against cheek or temple - but there should be no pressure. Think of it as a hand hovering near the face with just enough contact to ground the pose.
Photographers should check for this before every shot. Ask the subject to lighten up the touch. What feels like "almost not touching" to them often looks like a perfect, natural contact point through the lens.
This pose appears frequently in maternity portrait ideas and abstract portraits, and it's a consistent choice in editorial and fine art portrait photography for good reason.
7. Running fingers through the hair
Movement portraits. This is a different kind of hand pose because it captures action rather than a static position. One hand lifts into the hair - pushing it back from the face, running through from root to tip, or holding it away to one side. The motion creates a dynamic, effortless quality that's almost impossible to achieve with a static pose.
The secret: don't freeze mid-motion. Have the subject repeat the action several times in a row, and shoot throughout. The best frames are usually not at the extreme points of the movement but somewhere in the middle - when the arm is in transit and the expression is natural because the subject is focused on the action rather than the camera.
This technique is especially effective for subjects who say they feel stiff or unnatural in front of a camera. The action gives them something to do, keeps them engaged, and removes the self-consciousness that comes from standing still and being photographed.
Fall family portrait ideas sometimes use movement poses exactly this way, with family members interacting rather than standing static, creating images that feel candid even though they're fully directed.
8. Holding a prop
Props give hands an anchor. A mug, a book, a flower, a hat, a phone, a jacket held casually - any physical object shifts the hand from "what am I supposed to do with this" to "doing something real." The prop also adds a layer of narrative to the portrait. It tells us something about the person.
The prop should be natural to the person and the context. A musician holding an instrument. A reader holding a book. A professional holding a notepad. The prop becomes a visual shorthand for the subject's identity or personality, and the hands holding it look purposeful because they are.
For self portraits, props serve a second function: they give the photographer something to hold that justifies otherwise awkward hand positions when you're shooting alone. A coffee mug, a book, even a phone all work. The self-portrait becomes a scene rather than just a posed image. The self-portrait drawer tradition in art history is filled with artists using props - brushes, palettes, objects of personal meaning - for exactly this reason.
Choose props that have personal meaning when possible. The personality of the prop reads through the photograph.
9. Resting on a surface
A desk edge, a wall, a fence rail, a railing, a windowsill - any surface that gives the hands a reason to be there. Resting hands read as natural, relaxed, and grounded. They signal that the subject is at ease in the space.
This works particularly well for environmental or lifestyle portraits where the subject is photographed in a relevant setting rather than against a plain backdrop. The hands connect the person to the environment.
For front portraits specifically, the most common version is a light lean forward with one or both hands resting on a low surface in front of the subject. This also naturally draws the body forward and often produces a more engaging expression because the forward lean feels slightly more active than standing straight.
Anniversary gift portraits and birthday portrait gifts often use this kind of relaxed, context-rich setup because it reads as warm and personal rather than formal. The ease in the pose communicates something about the relationship - that this is a person comfortable in their own skin, worth celebrating.
10. Framing the face
Both hands, or one hand with the elbow raised, creating a frame around the face. This is a more dramatic, editorial choice that works best for fashion-forward portraits, artistic self-portraits, and images where the face is clearly the singular focus.
The framing can be loose - hands on either side of the head without touching - or closer, with palms along the jaw and fingers extending upward along the temples. The looser version feels more candid. The tighter version feels more deliberate and artistic.
This pose shows up frequently in abstract portraits and fine art portrait work, where the composition itself is part of the message. When executed well, it can be striking and memorable. When executed poorly, with tense hands or fingers pressing into the face, it looks forced.
The rule applies here as everywhere: soft hands, slight angle to the camera, gentle rather than gripping contact.
Couple poses: when two pairs of hands meet
Couple portraits introduce a completely new dimension to hand posing, because now you have four hands to place and they need to interact. The way two people's hands relate to each other tells the entire story of their relationship in a single frame.
Small contact reads as intimacy. Intertwined fingers, one hand cradling another, a palm placed gently on a shoulder or chest - these small gestures communicate connection far more powerfully than full-body embraces that can look staged.
One effective approach: have one partner place their hand lightly over the other's. Not grasping. Just resting. The weight of one palm on another reads as protective, affectionate, and natural. It's the hand language of long partnerships.
Another: both hands hanging between them, fingertips just barely touching. Or fingers interlaced, hands hanging naturally. Both communicate connection without effort or performance.
For the partner whose hands aren't involved in the connection gesture, use any of the solo techniques above. One partner's hand in the other's while the outer hand rests on a hip. This creates natural asymmetry in the composition and keeps the image dynamic.
Wedding gift art and anniversary gift portrait commissions often depict couples in exactly these kinds of poses - the hand connection is the emotional core of the image. The hands say what the faces confirm. Customized valentine gifts and valentines day gift for wife frequently center on couple portrait art for exactly this reason.
What to avoid: couples who grip each other's arms or hold each other with visible tension. The grip reads as nervous rather than affectionate. If the hold is tight, ask them to loosen and just rest. The lighter the touch, the more romantic the read.
Common mistakes that consistently ruin hand poses
Knowing what to avoid is as valuable as knowing what to do.
The penguin
Arms pressed flat against the body, hands dangling at the hips, shoulders dropping. The result is shortened arms, a compressed silhouette, and a general air of discomfort. The fix: always create a small gap between the arm and the torso. Even a few centimeters changes everything.
The mallet
A flat hand facing directly at the camera, usually when reaching toward something or resting on a surface. The palm appears enormous and draws the eye away from the face. Angle it.
The fist
Partial or full fist formation signals stress. The viewer picks it up even if they can't articulate why the portrait feels tense. If you see this happening, ask the subject to open the hand and let the fingers curve naturally.
The crop at the joint
Cropping a portrait at a wrist, finger joint, or knuckle is visually uncomfortable. It reads as an amputation. Crop at natural visual resting points - mid-forearm, mid-hand, at the waist - not at joints. This applies whether you're cropping in camera or in editing.
The twin
Both hands in exactly the same position, mirror images of each other. Symmetry feels mechanical. Asymmetry feels human. Give each hand a different job, even a subtle one.
The press
Hands or fingers pressing into the face, arms, or torso with visible pressure. Skin distorting under the touch, tension visible in the knuckles. Light contact only. If the touch is visible as pressure rather than presence, it's too hard.
How to direct subjects as a photographer
Most subjects don't know how to pose. That's your job. The way you give directions determines whether the result looks natural or awkward.
Avoid vague instructions like "relax" or "be natural." These are abstract. Give physical, specific directions: "Put your thumb in your right pocket." "Let your fingers just barely touch your cheek." "Lean your elbow on the desk and rest your chin in your hand." Concrete, physical direction produces results.
Demonstrate when necessary. Many subjects understand a pose far better when they see it demonstrated than when they hear a verbal description. Don't be precious about this - get in front of your own camera or simply show them the position with your own hands. A five-second demonstration is worth ten verbal instructions.
Affirm constantly. When a subject gets something right, tell them immediately: "That's exactly it - hold that." People relax when they know they're doing it correctly. The affirmation itself reduces tension and keeps the shoulders from creeping back up toward the ears.
For kids portraits, forget most of this. Kids don't take verbal direction about posing the way adults do. The better approach: give them something to do and photograph the result. Hold this, look at that, tell me a secret. The hands arrange themselves when children are engaged. The same dynamic helps with reluctant adults, actually - engagement beats instruction almost every time.
Keep energy high. Dead silence creates self-consciousness. Talk, tell stories, ask questions. A subject who's thinking about their answer to a question isn't thinking about their hands. That's when the best shots happen.
Angle, distance, and lighting considerations
Technical decisions affect how hand poses read in the final image.
Camera angle
Shooting from slightly above is the most consistently flattering angle for portraits with hands. It naturally slims the face, elongates the neck, and reduces the visual size of the hands. Shooting from below reverses all of this - hands can appear enormous when they're closer to a low lens than the face is.
For hand-in-pockets or hands-at-side poses, a horizontal eye-level angle often works best. For hand-near-face poses, the slight downward angle is almost always more flattering.
Distance from lens
This is the physics issue: objects closer to the lens appear proportionally larger than objects further away. A hand positioned between the subject's face and the camera will look significantly bigger than the face behind it. This is sometimes intentional and artistic. Usually, it's an accident and a distraction.
Keep hands close to the body rather than reaching toward the camera. This maintains proportion. When a hand does extend forward - perhaps toward the viewer in a creative pose - acknowledge the distortion and decide whether it serves the image.
Lighting
Hands catch light differently than faces. In front portraits, hands in shadow can look detached or mysterious. Hands in the main light look integrated with the face.
For clean, professional portraits, keep hands in similar lighting to the face. If a hand falls into heavy shadow, either redirect the pose or add a subtle fill light. The goal is a consistent, integrated look where the hands feel like a natural part of the portrait rather than an afterthought.
Abstract portraits sometimes use differential lighting on hands deliberately, creating a more dramatic or conceptual image. But for standard portrait work, consistency is the goal.
Tips for different genders and body types
Portrait posing has general rules, but they adapt to the individual.
For women
Feminine hand poses tend toward softer, more curved positions. Fingers gently extended. Light touches. Delicate contact with the face or clothing. The hands-on-hips pose for women typically works best with slightly wider spacing than for men, creating that flattering triangular negative space. Running fingers through hair, light touch at the collarbone, fingertips at the temple - these all photograph beautifully and feel natural.
Senior portrait outfits for women often incorporate flowy fabrics, layered pieces, and jewelry that interact naturally with hand poses. A hand lightly touching a necklace. Fingers adjusting a scarf. The clothing and the pose work together rather than separately.
Gentle movement during the shoot keeps energy alive and gives the hands natural positions. Static poses can feel stiff. Movement - adjusting hair, shifting weight, a slight turn - keeps everything looking alive.
For men
Masculine hand poses tend toward more deliberate, grounded positions. Thumbs in pockets. Arms crossed. Hands resting on a surface with purpose. Fingers fully curved around a prop rather than delicately extended. The general principle: less is more. One strong, clear hand position beats two uncertain, competing ones.
For professional headshots and corporate portraits - the kind that appear in company directories and professional profiles - clean hands-in-pockets or hands-clasped-in-front tend to be the most reliable choices. They read as confident and contained without requiring much active direction.
Senior portrait poses for guys lean heavily on these same principles. Casual confidence is the goal. Thumbs hooked in pockets, one arm slightly extended, leaning against a wall - all of these feel natural and photograph cleanly.
For larger body types
Use hands to create structure. Hands on hips with elbows out creates a triangle that defines the waist and adds visual interest to the silhouette. Avoid positions that allow arms to press against the body and merge with the torso. Any pose that creates space between arm and body is generally more flattering.
Crossing the arms can work well if the hands remain soft and the pose is relaxed rather than locked. The crossover creates a vertical line and draws the eye upward toward the face.
For petite subjects
Avoid poses where large props or extended arms dominate the frame. Hands closer to the body maintain proportion. Shooting from slightly below can help - the standard downward angle that flatters taller subjects can minimize petite ones.
Preparing for the shot: what subjects should do
This section is for the person standing in front of the camera. Knowing what to do before you're in position makes everything easier.
Practice in the mirror before your shoot. Not to rehearse poses, but to understand how your hands look at different angles and in different positions. Most people have never observed their own hand placement closely. A few minutes in the mirror reveals the angle that works, which fingers tend to stiffen, and what "relaxed" actually looks like for your specific hands.
Moisturize hands the day before, not the day of. Fresh moisturizer can look shiny under lights. Keep nails clean and at a consistent length. Jewelry can be included or removed - chunky rings can distract in tight hand-near-face poses, while subtle rings add elegance.
Wear something you feel good in. Confidence in your clothing translates directly to confidence in your posture and hand placement. When you feel uncomfortable in what you're wearing, that discomfort shows in the hands first. Family portrait outfits and senior portrait outfits guides exist precisely because clothing choice has such a direct effect on how people carry themselves in front of the camera.
Tell your photographer what you're worried about. If you hate how your hands look in photos, say so. If you always look stiff, mention it. A good photographer adapts to this information. They'll watch for specific issues and redirect before you fall into old habits.
Portrait art through history: what the masters understood about hands
The masters of portrait painting understood something that modern photographers are still learning: hands are a secondary face. They carry emotion. They complete the story. The greatest portrait painters used hands deliberately and intentionally, and their lessons translate directly to photography.
In Renaissance portraiture, hands were positioned to convey social status, learning, or virtue. A hand resting on a book signaled education. A hand extended in a gesture of benevolence signaled power. These weren't casual choices - they were designed to communicate specific messages to viewers who understood the visual language. A renaissance pet portrait follows this same principle today, positioning subjects with the same gravitas and visual intentionality that defined the great portrait masters.
The portraits that have endured through centuries aren't the ones where the hands are tucked away or ignored. They're the ones where the hands add something - a sense of the person's inner life, their occupation, their relationship to the world.
Royal pet portraits and regal pet portraits understand this instinctively, giving animal subjects the same careful compositional attention that Renaissance painters brought to human subjects. The positioning of paws, the angle of the head, the arrangement of the whole figure - it all serves the story.
This is the highest goal of portrait photography too. Not just to record how someone looked, but to capture how they were.
Editing and retouching hand poses after the shoot
Even with perfect in-camera technique, post-processing has a role to play.
Standard retouching for hands includes: evening out skin tone across the hand and wrist, reducing any harsh shadows created by lighting angles, and occasionally reducing the visual size of hands that appear larger than intended.
One useful technique: if a hand in the final image looks slightly too large relative to the face, a subtle transform adjustment in post-processing can reduce the size without touching the face. This is a minor operation that requires care - overdone, it looks obvious. But done gently, it can rescue an otherwise good portrait where the hand angle wasn't quite right.
For serious retouching on commercial portraits, hands receive the same careful attention as faces. Veins that are distracting can be reduced. Finger alignment can be adjusted. Color matching between hands and face ensures the image reads as a cohesive whole.
For standard portrait work, keeping edits light and consistent is the better approach. The goal is a portrait that looks like the best version of the person, not a digital construction.
Seasonal and contextual considerations
The context of a portrait changes what hand poses work best.
Fall and winter shoots - particularly fall family portrait ideas and xmas portrait ideas - often feature layered clothing, scarves, and hats. These props solve the hand problem naturally. A scarf to hold, gloved hands, hands wrapped around a mug of hot cider - context provides the answer.
Outdoor shoots add environmental elements. A hand trailing through tall grass. Fingers around a tree branch. Palms pressed against a rough stone wall. The environment itself becomes a prop. Family portraits in outdoor settings benefit from this constantly - there's always something to hold, lean against, or interact with.
Studio shoots have fewer of these natural solutions, which is why studio technique requires more deliberate direction. But studio shoots also offer more lighting control and backdrop flexibility, which can be used to make even simple hand positions look more intentional.
Maternity portrait ideas are a special case where the pose almost directs itself - the natural instinct to hold and cradle creates some of the most beautiful hand positions in portrait photography. The challenge in maternity shoots isn't finding a pose; it's selecting the best from many natural options.
Building your own posing vocabulary
The best photographers and subjects don't memorize poses. They internalize principles and then improvise. Once you understand why certain angles, certain levels of tension, and certain asymmetries work, you can find them in the moment rather than consulting a checklist.
Start with the fundamentals: angle the hands, keep them soft, give them something to do. Then layer on the specifics of each pose. With enough practice, directing hand positions becomes as natural as any other part of the portrait conversation.
Some photographers keep a small set of reference images on their phone - examples of poses they like and want to reference in session. This is a perfectly reasonable approach. You're not copying; you're translating a visual language into a new context.
Gift ideas for photographers sometimes include posing guides and reference books for exactly this reason. Building a visual library takes time, and having good reference material accelerates the learning.
When you want a portrait without the stress
Here's the truth about portrait photography: even perfectly executed poses look different from what we imagined. The subject sees themselves through a camera lens for the first time in months and suddenly notices things about their hands, their face, their posture that they'd never seen before. It's a familiar anxiety.
That's one reason Fable exists. You start with a photo you already love - one where you looked exactly the way you wanted to look, where your hands were fine and your smile was genuine. Then Fable transforms that photo into a stunning work of art: renaissance, royal, classical, custom-painted in a style that makes it something worth hanging on a wall forever.
Fable's family portraits turn your best group photo into something that belongs on a gallery wall. Fable's couple portraits transform a favorite photo into art that tells the story of the relationship in a visual language that has lasted centuries. Fable's kids portraits capture children at their most genuine - in a moment you already caught, elevated into something timeless.
You choose the photo. Fable handles the transformation. See the pricing and explore what's possible.
FAQ
What are the most natural-looking hand poses for a front portrait?
Thumbs hooked in pockets, hands resting lightly on hips, and hands near the face with soft fingertips touching the cheekbone or temple are consistently the most natural-looking options. The key across all poses is relaxed, slightly curved fingers rather than stiff, straight ones. Senior portrait poses rely heavily on these same positions because they work across age groups and body types.
How do I tell someone to relax their hands without sounding critical?
Avoid saying "relax your hands" - it's too abstract. Instead, give physical instructions: "Wiggle your fingers and let them fall." Or redirect the pose entirely: "Put your hand in your pocket" or "Rest your hand here." The goal is to remove the subject's attention from their hands entirely. When they're focused on something else, the tension leaves naturally.
Should hands be visible in every front portrait?
Not necessarily. Some portraits work beautifully with hands completely out of frame, especially tight headshots where the crop is at the shoulders or chest. But for three-quarter and full-length front portraits, hand placement becomes a major compositional element that needs intentional direction. Letting hands fall into the frame without direction almost always produces awkward results.
What do I do with my hands in a self-portrait?
Holding something is the easiest solution - a mug, a book, a piece of clothing. A second option is the hands-near-face pose, which is easy to set up and photograph alone. For more involved self-portrait work, a remote shutter release frees one hand while the timer fires. Self portraits and the self-portrait drawer tradition in art history both show how solo portrait work can use props and staging to create images with genuine depth and presence.
How do hands look different for men versus women in portraits?
Masculine poses tend toward more deliberate, grounded positions - thumbs in pockets, arms crossed, hands resting on surfaces. Feminine poses tend toward softer, more curved positions - light touches at the face, fingers gently extended, hands at the hip in a more open position. These aren't rigid rules, but they reflect the general visual vocabulary that reads as confident and natural for each. The senior portrait outfits you choose also influence which poses feel most natural.
Can I fix bad hand poses in editing?
Minor issues - a slightly awkward finger angle, a small shadow - can be adjusted in post-processing. Major problems, like a hand that reads as tense or disproportionately large, are more difficult to fix without it looking manipulated. The better approach is to get the pose right in camera. Editing is for refinement, not rescue.
What should I do if I just hate how my hands look in photos?
Angle the hands so the thin edge faces the camera rather than the flat palm. Keep fingers gently curved rather than straight or spread. Avoid any position that brings the hand close to the camera lens, which magnifies it. For portraits where hands are a significant concern, working with a photographer who understands these issues - or choosing portrait styles like classical paintings, where artistic interpretation creates the final image - can remove the self-consciousness entirely. Fable offers this kind of artistic transformation for people who want a stunning portrait without fixating on specific features.
How do family portrait hand poses work with multiple people?
Group hand poses work best when there's a clear hierarchy of connection. Parents' hands on children's shoulders. Partners with intertwined fingers. Siblings with arms around each other. Each connection creates a visual line that holds the group together. The key is keeping every individual's hands purposeful rather than letting them dangle. Family portraits and fall family portrait ideas have more guidance on coordinating full family sessions.
Related guides
- Senior portrait poses
- Fall family portrait ideas
- Maternity portrait ideas
- Family portrait outfits
- Family portraits
Sources
- Expert Photography: 11 Best Hand Poses for Portrait Photography
- Skylum: Hand Poses - 12 Best Tips for Portrait Photography
- The Lens Lounge: 8 Tips for Posing Hands in Photography
Hands are expressive. They always have been. Every great portrait painter knew this, and every portrait photographer who's built a lasting body of work knows it too. The person standing in front of your camera carries their whole history in the way they hold themselves, the way their fingers curve, the way their hands rest or reach or hold. Learning to work with that is what takes portrait photography from documentation to art.
And if you've found the perfect pose, captured the perfect moment, and want to give that photograph the permanence it deserves, Fable is ready. Upload your photo, choose your style, and see what a portrait can become.